Workflow-Structures
Structure of an ActionScript
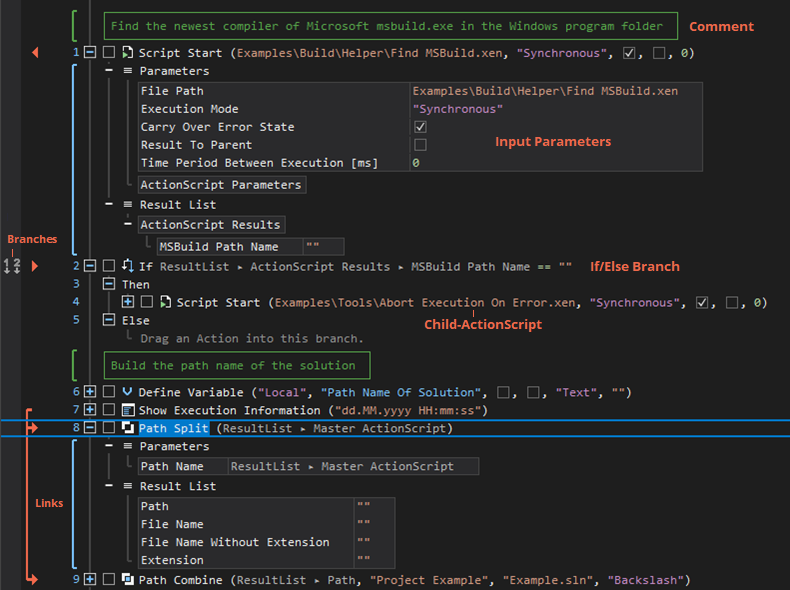
In XenoGuard, an ActionScript is visually represented as a tree structure. Within this structure, each ActionStep is a single node. The ActionSteps are executed sequentially from top to bottom, starting from the main node. Branches and loops are implemented through child nodes, enabling branching and complex processes. Both the input and result parameters are also displayed as nodes within the tree.
The next two figures demonstrate this concept. The upper illustration displays an ActionScript with closed nodes, showing only the first level. Below, the same script is depicted with partially opened nodes. The red arrows and connecting lines indicate the dependencies between the actions.


- Individual nodes can be expanded and collapsed to show or hide details as needed, similar to a folding editor.
- The parameterization of the ActionSteps, meaning the definition of all parameter values, occurs directly within the ActionScript in a uniform manner for all actions, eliminating the need for separate dialog boxes.
- The parameters and data of all ActionSteps are always visible and can be easily manipulated through drag-and-drop.
- The tree structure facilitates a clear representation of structured data and results, especially for REST and JSON data structures. Multiple data records are displayed in list or table formats.

|
When an ActionScript calls another ActionScript, it is referred to as a child ActionScript. The top-level ActionScript is known as the master ActionScript and represents the entry point, comparable to the main() method in programming languages such as C or C#.
|
Structure of an ActionStep
XenoGuard displays various pieces of information for each ActionStep. Each step starts with a line number, followed by an expandable node containing the input and result parameters. Subsequently, two icons are displayed: the first indicates the execution status, and the second is the actual action icon, depicted as a pictogram visually representing the task performed by the action. Following these, you will see the ActionStep caption and the input parameters. This format is both compact and informative, resembling the way program code is presented in Microsoft Visual Studio.
