Child ActionScripts
Dividing a complex workflow into individual scripts is essential for improving maintainability, readability, and reusability. In this approach, a so-called Master ActionScript or master script serves as the entry point for the application. This master script is responsible for controlling the overall flow and, subsequently, calls child scripts. These child scripts are standalone units that perform specific tasks. The benefits of this modularization are numerous:
- Maintainability: Since each child script fulfills a distinct task, it is simpler to locate and fix errors. If an error occurs in a module, only that specific module needs to be reviewed, not the entire codebase.
- Readability: Splitting into scripts significantly enhances readability. Developers can focus on the specific logic of a module without being distracted by other parts of the program.
- Reusability: Child scripts can be reused in different parts of the program or even across various projects, saving time and resources in developing similar features.
- Parameter Passing: The scripts can accept and return input and output parameters, facilitating communication between modules. This allows for efficient data exchange between different parts of the program.
Overall, splitting a workflow into child scripts enables more efficient development, maintenance, and scalability of your automation solution.
Synchronously Starting Child Scripts
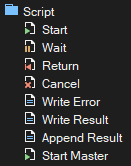
In the Workspace Explorer under the main category Programming, you can find the Script folder containing all ActioniSteps related to scripts. With the Script Start action, you can execute an ActionScript.

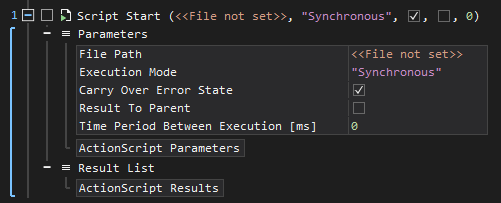
The Script Start action has five input parameters, which are explained below.

| Parameter | Description |
|---|---|
| File Path | This parameter specifies the path to the ActionScript file to be executed. Application: Provide the exact path of the script file to be started, such as a local path or a path on a network drive. |
| Execution Mode | This parameter determines how the ActionScript is executed. Application: Choose Synchronous if the master script should wait for the completion of the started ActionScript. Choose Asynchronous if the master script should continue independently of the completion of the ActionScript. |
| Carry Over Error State | This parameter decides whether error states from the started ActionScript should be transferred to the master script. Application: Enable this option if you want errors in the child script to also affect the parent (master) script. |
| Result To Parent | Decides whether the results of the started ActionScript should be transferred to the master script. Application: If this option is activated, the results of the child script are copied to the parent script and can be further utilized there. |
| Time Period Between Execution | This parameter sets a time delay (in milliseconds) between repeated executions of the script. Application: Specify a value in milliseconds if you want to call an ActionScript at regular intervals within a loop. As long as the time delay has not elapsed, the action is essentially skipped, and the script is not started. |
Script Call via Drag-and-Drop
Here's how to create a script call via drag-and-drop in XenoGuard:
-
Selecting the ActionScript in the Workspace Explorer: Navigate to the ActionScript you intend to incorporate into another script within the Workspace Explorer.
-
Executing Drag-and-Drop for Script Integration: Left-click and hold the desired ActionScript in the Workspace Explorer, then drag it to the target ActionScript's open window.
-
Positioning in the Target ActionScript: Direct the cursor to the desired insertion point in the target ActionScript. Release the mouse button to finalize the drag-and-drop.
-
XenoGuard's Automatic Script Integration: XenoGuard auto-detects this operation and automatically adds the Start ActionScript action at the drop location.
- Finalizing the Script Setup: Optionally adjust further parameters for the Start Script action or proceed with the development of your script.
This described drag-and-drop method offers a quick and intuitive way to create script invocations in XenoGuard and simplify their integration into other scripts. It optimizes the workflow and reduces manual inputs.
Child Scripts with Input and Result Parameters
In XenoGuard, the conceptualization of scripts into two levels - namely parent and child scripts - is a key feature that enables the modularization and reuse of script functions.
-
Child Scripts and Their Parameters: Child scripts are essentially subscripts that can take on specific tasks within a larger, more comprehensive script (the parent or master script). A crucial feature of these child scripts is their ability to have input and result parameters.
-
The Role of Identifiers: As discussed in the section about identifiers, XenoGuard has already highlighted the utility and significance of these special identifier types. Identifiers are used to uniquely name and reference certain data or functions. Thanks to their uniqueness, they enable precise and error-free data manipulation and control.
-
Design-Time Integration: Since both input and result parameters of child scripts have unique identifier names, they can be easily viewed and used during the script's design time. When a developer creates a parent script, they can integrate a child script and immediately view its input and result parameters. This significantly simplifies the script creation process, as there is a clear and defined interface between the two scripts.
- Advantages and Reusability: The clear separation and naming of the parameters of child scripts allow for modular programming. A once-defined child script with a set interface can be reused in various parent scripts or even in different projects. This not only promotes efficiency but also consistency and reliability in the scripts developed.
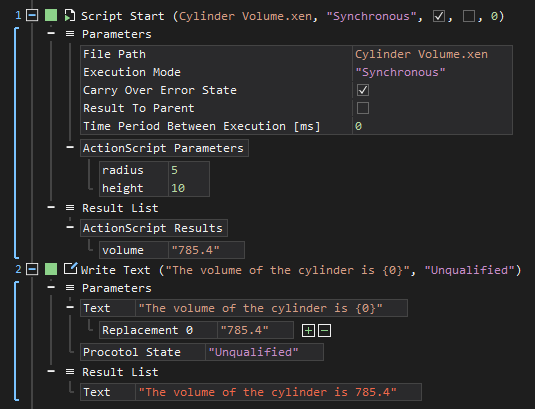
Let's revisit the example of the cylinder volume script. This script uses the input parameters radius and height to calculate the volume of a cylinder. In the subsequent master script, the child script Cylinder Volume is called. Both the input parameters and the result parameter are clearly recognizable and readily available for further steps.

Overall, XenoGuard, with its concept of master, parent, and child scripts and the use of identifiers, provides a flexible and efficient system that enables structured, modular, and reusable script development.
Controlling ActionScripts
The power and flexibility of an automation platform like XenoGuard are determined not just by its ability to execute a wide variety of actions, but also by how these actions are organized and controlled. While loops and conditions are fundamental building blocks for repetitive and conditional execution, there are additional control structures that allow developers to more finely control the flow of an ActionScript. These control structures, including Break, Label, Goto, On Error Continue, On Error Goto, Abort On Error, and Abort, enable script developers to respond to specific situations or error conditions, deliberately control the script's flow, or completely terminate the process. Each of these structures has its nuances and use cases, which are detailed in the following section.
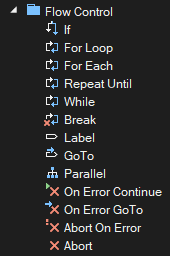
Like loops, the control structures are contained in Programming::Flow Control:

The control structures enable you to perform the following tasks:
| Action | Description |
|---|---|
| Break | This structure is used to prematurely end the execution of a loop. When a Break command is reached in a loop, the loop is terminated, and execution continues with the next command after the loop. It is particularly useful when a specific condition is met and further execution of the loop becomes unnecessary. |
| Label | A label serves as a marker or anchor point in a script. It can be used in conjunction with Goto to jump to this specific point in the script. Labels are useful for structuring the flow, especially in complex scripts where certain sections need to be repeated or skipped. |
| Goto | This action allows the script's flow to jump directly to a previously defined label. It can be used to change the flow based on certain conditions or to re-execute certain parts of the script. |
| Parallel | This action is used for simultaneously executing actions in two separate branches. Instead of sequential processing, tasks in both branches are executed concurrently. |
| On Error Continue | This structure indicates that the script should continue even after an error occurs. It is useful in scenarios where certain errors are expected and should not interrupt the entire process. |
| On Error Goto | Upon an error in the script, execution jumps to a specific label. This allows for the creation of custom error-handling routines, such as writing logs or taking recovery actions. |
| Abort On Error | This structure indicates that the script should immediately terminate upon encountering an error. This is useful in critical workflows where errors should not be ignored or bypassed. |
| Abort | Regardless of errors, the script is immediately terminated when this command is reached. Ideal for scenarios where certain conditions require an immediate end to the script, e.g., due to security concerns or other critical conditions. |
In summary, these control structures in XenoGuard provide developers with a high degree of flexibility and control over the flow of their scripts, enable custom error handling, and facilitate the implementation of complex processes and logics.